


Making the Flower Garden: Part Three
It's time to finally put pencil to paper, to find my style, to dig or not to dig, to get some plants in the ground and make a fabulous garden!
Part Three
Trace, design, repeat
It was time to finally put pencil to paper, gather a ready supply of erasers, rummage around for a sharpener, and leave the kettle on the Aga for copious amounts of tea! This is going to be thirsty work! (There may have been a few chocolate hobnobs on the table too, but they didn’t last long. They never do!)
First things first, the plan! Ideally drawn to scale, so you know exactly what you’re dealing with. To help me, I bought a surveyors tape measure, one of those 50m tape measures on a reel that you can peg at one end and stroll off into the distance with the other.
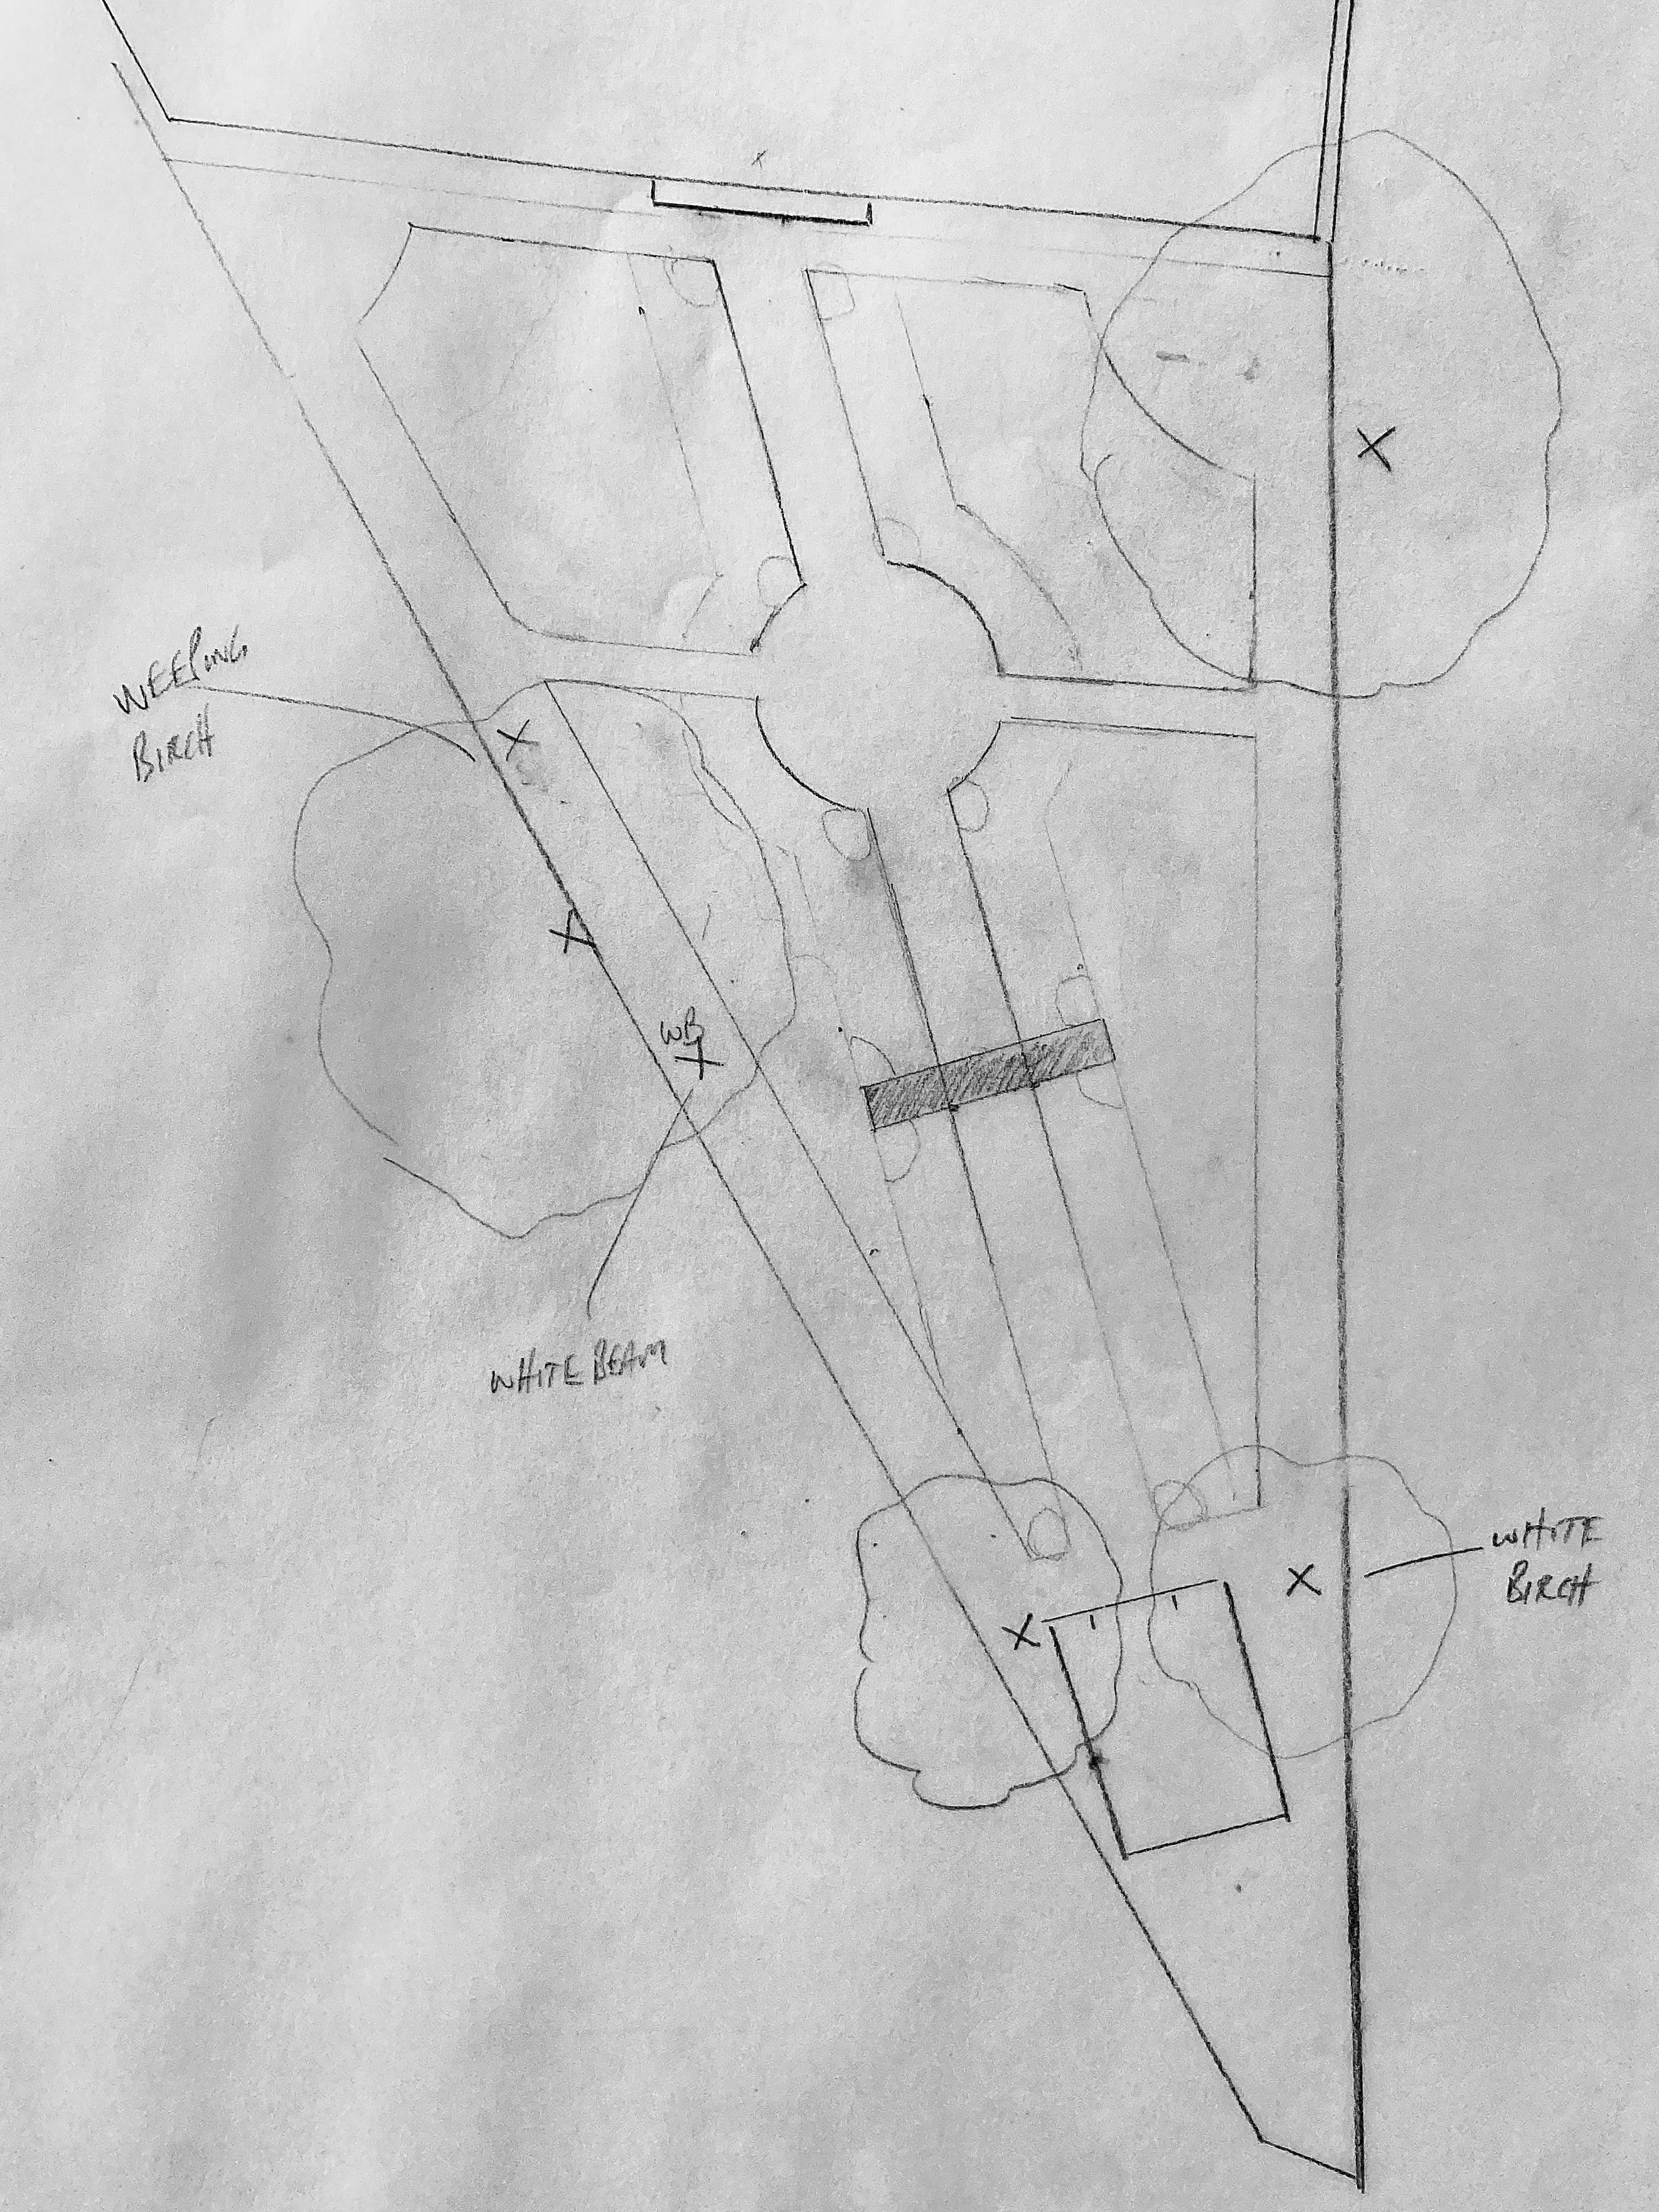
I took various measurements, triangulating to fixed points along the fence posts, to the corners of the potting shed, the foot of the terrace wall. The garden is technically an isosceles trapezoid: 14m (45ft) across at its widest, 6m (20ft) at the narrowest, 16m (52ft) in length. This gave me approximately 160m² (1,720ft²) of garden, minus the gravel paths around the outside (but they would disappear in the next phase)
Then I retired to the kitchen table, with my A3 graph pad, and drew out a formal site plan to scale. I then slipped this between the pages of an A3 tracing pad to quickly copy the shape and scale, while faffing around with various designs. Yes, you could do all this on a tablet, but I wanted the large format. We both needed to sit around the table to discuss and edit. I also find it far quicker to sketch too.
I drew serpentine borders and circular seating areas, formal square divisions with serpentine path, inverted triangles, circular beds and lawns, diagonals, island borders… all resulting in lots of scrunched-up balls of tracing paper, scattered across the kitchen floor. I took a break. For a few days.
Back to the drawing board
I was veering off my path. Seduced by all the fancy intricate designs from magazines, flower shows, and Gardener’s World (obvs) beamed into my living room every Friday evening. I literally went back to the drawing board (dining table) and I thought about all the most beautiful borders I’d seen. Gravetye, Dixter, Sissinghurst, Hidcote, Waterperry…
They were all of a similar era and style. Robinson, Christo, Sackville-West, Beatrix Havergal, Lawrence Johnston, all employed the long border, in one form or other. Long borders are simply linear, but on a fantastical scale. Yes, they are very traditional and arguably old fashioned, but so what?
As much as I appreciate contemporary garden design, marvelling at the creations at Chelsea, there’s a fair-sized chunk of me that enjoys the old, the simple, and the traditional, especially Arts & Crafts. Landscape design credentials aside, these borders are all staggeringly beautiful, impactful due to their scale, memorable, and their particular genius lies in their planting design.
Remembering my needs
I also then returned to that one all important question… What did we NEED? The direct path to the potting shed, which is also where the lower access gate and bins are. All bulk bags of compost and aggregate for the garden(s) would be delivered down there. So no fancy winding path. Just get down there as quickly as possible. Check!
Those long sumptuous, luxuriant borders of the great gardens… What if I attempt to emulate those and add shrub roses? Hedged with the Hydrangea paniculatas? Massive 16m (52ft) long double borders running down each side of the path. For a modest garden like this, they would be enormous! Up to 3m (10ft) deep at the top of the garden. But wow! They would be quite remarkable.
The seating? Yes, I would have a chair in the potting shed, but what about in the garden? I could have one facing east and one facing west. Then, whether it’s morning or afternoon, I have the choice of a seat in sun or shade. Great! Then tuck another under the Terrace wall, out of sight, just for Jacq. Sorted!
Simplicity wins
In the end, it was simple. I remember that I was not a garden designer. Just a humble gardener whose gardens evolve over time. It was time to let the borders do the talking. Cut a wide and direct access path down the middle. Add two side paths to the benches. Mass all the plants in massive borders running the entire length of the garden. Piece of cake! (With tea? Don’t mind if I do! Nomnomnom!)
This design is as simple as it gets. But there are a couple of design quirks that are a little more subtle. I don’t like how narrow the garden looks and feels at the bottom end, by the potting shed. This loosely triangular plot needed the positioning of trees and structural plants that gradually span wider, countering the pinch at the bottom.
Thinking ahead, I wanted the planting to envelop you as you step down from the terrace garden. To feel cosseting. So you feel wrapped up in blooms, comforted, hidden away. Therefore I need taller plants that also lift the eye. I hoped that all the clematis would mask the fence completely, in effect, blurring the fixed boundary.
The trees and structural plants would create a relationship with the trees outside of the garden, in effect, borrowing the neighbours trees and the adjacent hedgerow (thank you for this tip Adam Frost). Together, this further masks the triangular shape, making it feel wider and larger than it is. You only see the true shape in winter.
Now, we have a scaled design, we have the plants, mostly chosen according to the conditions, with just a few outliers that are testing the water, so to speak. I am trying roses, despite the alkalinity. But I’m using plants grown from cuttings, rather than risk losing expensive shop bought potted plants.
Let’s get on with planting!
To dig or not to dig
Just a few years ago, ‘No Dig’ seemed to be quite an alien concept. An outlier even on the left field. When I mentioned it, or posted about, many gardeners just had no idea what I was talking about. “How can you garden without digging?!”
The methodology has gained real traction and popularity in recent years. You know it’s gaining momentum when the presenters of Gardeners’ World are mentioning it! No-dig was pioneered by renowned veg grower
. He has brought it to the fore and inspired me to adopt the method permanently.This Flower Garden is a no-dig garden, although ‘holes’ have been made. On Instagram I was accused of ‘betraying the no-dig philosophy’ whatever that means. It amazes me there can be such borderline militant ‘absolutes’ even within the gardening world. I think they had missed the episode where Charles plants trees and shrubs! Anyway, here’s the broadest defining character of a no dig garden…


Limited soil disturbance
You simply leave the ground intact. As much as possible. Under the surface are trillions of lifeforms from single-cell protozoa to the earthworm, from microbes to fungi, all interconnected in the soil wide web or soil biome.
When you dig, you damage this network of roots, fungal threads, airways made by worms and other soil-living organisms. It takes time for the ‘digging damage’ to repair and is usually masked by excessive fertilisers applied after planting, which in turn can damage soil life further.
No dig aims to minimise any disturbance, allowing plants to root down, through the organic mulch, and tap into the soil biome naturally, establishing quickly, growing healthily, without added fertilisers.
You can simply lay compost mulch on the grass and plant directly into that mulch, if it is thick enough. It needs to exclude light, so I still feel it’s best to lay a think layer of brown cardboard first, then the compost. You would still need to dig out the occasional perennial weed with a trowel and the repetition of severing its root will weaken it and eventually die off. You will also need to ‘dig’ when you’re planting something with a rootball deeper than the layer of compost.
You have no choice, unless you want to lay compost 30cm (12in) deep, or more? One, that’s impractical unless you’re creating raised beds. Two, that would be extraordinarily expensive, even in a modest garden, and few have the resources to make the required quantities from their own composting.
Another thing to bear in mind is the ‘quality’ of the grass you’re transforming. Is it pure grass? Is it a weedy lawn? Is it fallow pasture? My lawn had dandelions, docks, plantain, selfheal, thistle, couch grass, and bindweed. All tough and pervasive perennial weeds, only controlled with regular mowing.
I used a thick, overlapping, layer of brown cardboard to exclude light. Then the compost laid onto this. As tough as some of these weeds are, they cannot survive without light. By the second summer, all the perennials weeds had vanished, the last to give-up was the bindweed. Weeds still arrive, on the wind, in bird droppings, etc. But they are easily removed when caught early.
Needs must
In this garden, I have sliced holes into the lawn, just large enough for potted rootballs, leaving the plant’s crown proud of the surface - because I will mulch around each plant with cardboard and compost. The premise of limited soil disturbance is intact. I have not dug-over or cultivated the soil in any way. Once planted, the new plants are in direct contact with the existing soil biome and I’ve encouraged their establishment by using Empathy’s Rootgrow mycorrhizal fungi.
If your soil is healthy and fertile, you do not need mycorrhizal fungi. It will be existing naturally in the soil. My topsoil was imported for the turf (sod). Before the lawn, the ground had been covered with concrete pavers for over two decades. It’s fair to say my soil was poor and lacking in life and nutrients, so I decided to add mycorrhizal fungi.
As there is a layer of truly compacted ground below the topsoil, I have had to break through this. It’s so hard I’ve used a chisel-ended wrecking bar. And I’ve chosen to break through because otherwise the planting hole could act like a container, with winter rain unable to drain away. In some areas of this garden, you would, in essence, be creating a clay bowl. So, the bases of some planting holes were punched through. Occasionally I would come across a buried brick or paver, so these were removed too.
Rapid establishment
Although I had made the no dig Kitchen Garden, that was based on raised beds. I was confident that would work. This flower garden was, for me, an experiment. But a successful experiment it was too! Even by the first summer I was amazed at just how quickly the plants were growing and establishing.
They were healthy and vigorous, despite the seemingly poor dry soil and alkalinity. By year 2, plants were towering above me, far outgrowing their size detailed on the plant labels or the RHS Plant Finder. The most impressive were (and still are) the roses! Yes!!
Take ‘Mill on the Floss’ or ‘Emily Bronte’ as examples. These were from hardwood cuttings. No special rootstock. No special treatment, other than yearly pruning and mulching. Their suggested height is 4ft to 4½ft (125-140cm). Mine are well over 6ft (180cm). Summer growth from the Floss is over 2.5m (8ft) long. Their deep roots may have tapped into the clay substrate and found a reservoir of moisture and nutrients, or it’s a combination of that and the now healthy soil with an undisturbed biome.
It’s hard to say exactly, but here are a few other examples and these do not have deep roots. Helianthus ‘Sheila’s Sunshine’ reference growing height is around 2m (6-7ft). Here they are well over 3m (10ft). Last year they reached 4m (13ft). Absolutely enormous!! Salvia ‘Amistad’ should be around 1.2-1.5m. Here they are well over 2m. Althaea cannabina should be 1.5-2m. Here it is 3m at least. I am not complaining. I love the height and they rarely flop. They’re still growing tough!
Phase One: Completed
After the initial phase of planting, I had grass paths, dividing four quadrant beds, with a central grass circle in the middle. A gravel path surrounding the entire garden. From the Terrace steps the side paths are out of view, so the borders appear to run, uninterrupted, for the entire length of the garden, around 16m or 50ft. At the top, they are 3m (10ft) deep and at the very bottom they are just 1m (3ft) deep on either side.

Clematis have been planted on obelisks for height and structure, as well as along the fence. The roses were planted relatively close to the path so they can be admired, smelled, and cut for the house. Either side of the main path, a line of Hydrangea paniculata (see pic above) creates quite a show in high summer. In spring, clumps of Narcissus ‘Tête-à-Tête’ bring early cheer. Running through all the borders, in a wide ribbon, are the Stipa tenuissima, to bring movement and change of form.
Overall the planting is asymmetrical. There is similar planting running either side, but offset, so plants are repeated across the borders, drawing the eye along. I’ve used the tall Delphinium elatum ‘Faust’ and Verbena bonariensis, with the smaller gaura and nepeta alternating their positions down the borders.


In the seasons to follow
Over the next three years, the borders would be pushed right back to the fence, creating immense border depths measuring over 6m (19ft) deep! The grass paths will eventually be pulled up and replaced with gravel and cor-ten steel edging.
But there are failures too. The clematis did not take. One by one they failed. Those planted on the fence were replaced with climbing and rambling roses which look fabulous! Every cloud… (As a gardener, you must be able to flip every failure into an opportunity to try something new!)
The hydrangeas were great, initially, but there was just too much of the same and nothing but twigs and leaves until July or August. I wanted more immediacy and colour earlier in the season. They were eventually pushed back into the borders, but overwhelmed by the simply enormous herbaceous perennials. There are plenty more lessons to learn, so…
Are you hungry for more?
Would you like to know how the space developed? What about the nurturing, watering, pruning, feeding, supporting, editing? How about the phased expansion with additional trees and shrubs, more structure, more height? Losing gravel paths, making new gravel paths, felling an ash tree, expanding borders even further, more ornamental trees, deeper beds, plants that thrive! How about the current plant list and current planting plan! Let me know in the comments and I’ll get to work!
Coming up…
If I could turn back the clock and just have a little chat with my younger self, just as he took his first tentative steps along the winding garden path, I would say this: “Embrace failure”. Failure is a good thing. I would go as far as to say that failure is arguably the most potent learning device there is.
Ruth Stout (1930s) may have been the person to originate no dig gardening. And maybe she wasn't the first. But we shouldn't forget her and her pioneering work.
Thank you Elliott, a great read as usual.