Planting bulbs in your borders brings an early heart-warming cheer, heralding the changing of the seasons, as we slowly meander our way out of late winter. Even though they’re tiny, those first snowdrops, cyclamen, aconites, and crocus are worth more than their weight in gold. Especially after weeks of dull browns and greens within a fairly lifeless garden. The structure of evergreen hedges and topiary have served an important purpose but now the interest is waning. Those early gems, much loved by us gardeners desperate for life and colour outside those foggy rain-drenched windows are loved even more by emerging bumblebees, drowsy and famished after a winter’s hibernation.
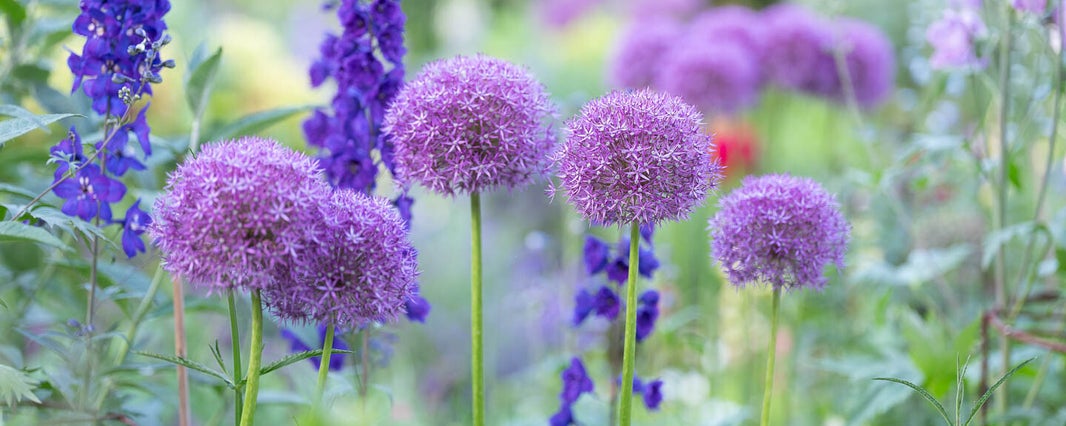
As the months progress and winter clings, the slow procession and succession of spring-flowering bulbs eventually builds a head of steam and by April, we’re galloping into Spring with the full glory that is the tulip! Spring bulbs in the border can be as subtle as a nonchalant nod to the season, or as gaudy and as flamboyant as carnival. Requiring a different approach to carefully orchestrated container displays, planting out in the wider garden requires more understanding of your soil, the opportunities of deciduous tress and shrubs, jostling for position amongst existing perennial planting, and fathoming planting combinations with colour and form.
Soil Types
The Dutch growers exult a neutral PH ‘sandy loam’ as the perfect soil. A seemingly mythical mixture of clay, sand, silt and organic matter for the best root development. Acidic or Alkaline soils apparently inhibit root growth, but I don’t think anyone told my garden bulbs. My garden soil is strongly alkaline, practically off the scale with a substrate of Alkali (a strongly alkali clay). However, my soil's saving grace is the high levels of organic matter from years of mulching. The soil in the Cottage Garden is also very well drained, just passable in the Flower Garden. However, waterlogging is practically impossible due to the slope of the hill.
My rather rambling point is, most spring bulbs will thrive in any well drained soils, so don't worry too much about the nuances. Heavy clay is another story. Camassia leichtlinii and Fritillaria meleagris, the Snake’s Head Fritillary, both thrive in heaver soils, even with occasional winter flooding. Whereas other species demand well drained soils and struggle in clay, purely down to its winter waterlogging characteristic. That, leads to rotting! You can improve clay through the slow process of mulching, but you may be better off sticking to a container display, especially if flooding and waterlogging is a regular occurrence. Adding grit to a planting hole is no longer recommended.
All this being said, I visit many gardens around the country with all manner of soils and they all manage to grow bulbs. As with all planting, the references you find online and on plant labels speak of ideals. Ideals that very few of us are likely to find in our gardens. I'm sure some of you reading this will be thinking 'Well, I have clay soil and my bulbs grow fine!"

“Bulbs in the lawn… Yes or no?”
Yes! Absolutely! My lawn usually receives its last cut in early November. Swiftly followed by bulb planting. Every year, I add a few more. It's not a swathe, just a very cheery sprinkling of spring colour. I mostly use Crocus with a scattering of Iris reticulata. The best crocus for naturalising is Crocus tommasinianus, the woodland crocus as it will gradually increase its number and is ideal for 'poorer' lawn soils.
A question from Instagram by @tamblyn.teddy
Naturalising bulbs in lawns
The most natural way to plant bulbs in a lawn is to 'broadcast' them. This is far easier if you've cut the grass nice and short first. To broadcast bulbs, literally grab a handful and throw them across the lawn. Easy! If you have different species and cultivars, empty them all into a bucket and mix them up first.
Now, once you've thrown them around your lawn, simply plant them where they land. Even if they look too close together. If you methodically space them out, it all looks very regimented and artificial. It seems the human brain is not especially adept at random placements even when you try to be random. In my lawn I keep the bulbs about 50cm away from the border edging and keep a clear space through middle, so there is a subtle but useable path around and through to the bench, without having to trample over the crocuses.
Tools for the job
Using a long-handled bulb planter is the easiest and most efficient method that I’ve found so far. A quality long-handled bulb planter has a spade-length shaft, T-handle, and a sharp ‘hole cutter’ with foot tread at the business end. I have the Burgon & Ball Long-handled Bulb Planter which is ok, but there's only one foot tread in on the rear which isn't ideal, as your foot tends to slip off at the merest sign of mud, dew or rain. I actually prefer this design by Spear & Jackson and Kent & Stowe because they have a tread that spans both sides, designed so you can really grip with your boot tread. For those with deeper wallets and a need for supreme workmanship, the Sneeboer 'Great Dixter Bulb Planter' is the pinnacle of bulb planting tools! When you're planting in lawns, because the soil is usually very firm, avoid the small one-handed bulb planters. They're only suitable for very loose, well-cultivated soil. Trust me. Your wrists will thank you!
If your ground is particularly hard, wait for a period of rain before tackling the planting. If it’s still too hard, water the lawn. If it’s still too hard to even get a trowel in there, you could try a ground auger - an oversized drill bit to mechanically cut the hole in the ground. Look for one that is at least 20cm (8in) in length. I often use one on my cordless drill. I strongly recommend a two-handed drill for this and hold it very firm. If the auger catches a stone or root, it can jam, violently spinning the drill round and potentially injuring your wrist. You have been warned! If you’re feeling really flush or like your gadgets, you can get one of these handy dandy Ryobi augers.
The long-handled bulb planter makes a far cleaner planting hole. As you force the bulb planter into the ground, you create a neat core of soil, capped with turf, that you can just pop back in the hole. Or, you can quickly cut several holes, with each ‘core’ forcing out the previous one. You’ll end up with cores all over your lawn, which you just pop them back in and heel down. After a few weeks, the grass meshes together again and the holes disappear. Marvellous!
The only drawback of the bulb planter (that I can think of) is if you're using it in clay soil. In clay, the hole you've cut may have very smooth sides, possibly limiting the lateral movement of bulb roots. More importantly, you might create, what is in effect, a clay pot, where rainwater accumulates inside the hole and rots the bulb.


Niwaki Hori Hori
The Hori Hori is a very useful tool as it doubles as both a trowel for planting and a knife for weeding. It s great size for smaller bulbs.
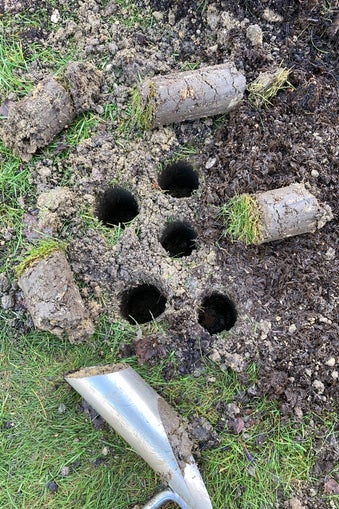
Burgon & Ball Bulb Planter
Using the bulb planter, quickly cutting multiple holes in the lawn, ready to drop in spring bulbs and replug.
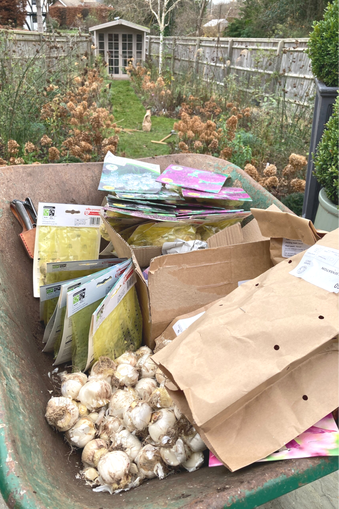
Barrow full of bulbs
We don't do things by halves! A barrow full of bulbs from Crocus.co.uk, Farmer Gracy, and local garden centres.

Bulbalicious!
Bulbs are a delicacy for squirrels, so plant those tempting tasty bulbs good and deep. To keep them out of reach of those relentless rodents, plant them 4x times their own depth at the very least.
I tend to plant even the smallest bulbs (crocus) at the full core depth and they grow and flower absolutely fine. So don't be afraid to plant them too deep. FUN FACT: Crocus bulbs, among others, have contractile roots and can adjust their own depth!
Planting in borders
When we first planted these Cottage Garden borders with bulbs, we were slightly over-enthusiastic, to put it mildly. Looking back, we had obviously taken leave of our senses! We packed in well over 1,000 bulbs with alliums, camassia, narcissus, iris, and tulips, all in roughly eight metres of narrow border. Although it looked absolutely spectacular in the first year, there was just too much competition. Who'd have thought it?!
The lush leaves of narcissus, alliums and camassia smothered the young roses and emerging perennials. Camassia leaves persist for weeks after flowering and continue to grow. Slugs and snails gorged on the abundant luxuriant growth and used them as cover to sneakily plan their attack on other pants. The lupins and delphiniums never stood a chance!
By the second year, many of the tulips were fading or blind (no flower). I also faced another issue when I came to plant new perennials, I was forever digging the bulbs up! In short, it all became a bit of a headache. With the best intentions, it was poorly thought out. Consequently, I’ve now lifted many of the bulbs, thinning them out and replanting them elsewhere.
Having learned that lesson, when I plant bulbs in the borders, I’m planting small bulbs in tight groups and the larger leafed bulbs (narcissus, tulips, alliums) are planted singly, or in 2s or 3s, maximum. As they’re planted in between the perennials, I’m paying close attention to whether the bulbs have large leaves and whether the neighbouring plants will grow early and vigorously enough to compete. Aesthetically, I’m looking for ‘a nod to spring’, not a Dutch tulip field.
As for planting depths, the usual mantra applies - 3-4x time the bulbs height. If you have a light sandy soil where frost can penetrate deeper, or tenacious squirrels, plant your bulbs extra deep at least 4x the bulb’s height, more if possible.
A tip I’m taking onboard from Great Dixter is to use small sections of cane to flag bulb planting sites within the borders.
Planting design
Convention dictates that smaller plants go at the front of the borders and large plants toward the back. But, I'm just not a fan. I've always found this 'planting scheme' regimented and more than a little dull, whether it's for bulbs or herbaceous perennials. To me, it makes sense to plant certain bulbs where you would find them in nature. Snowdrops, cyclamen, crocus, aconite, bluebells, etc can all happily thrive beneath deciduous trees and shrubs. But, I will also scatter a few towards the front, along with dwarfing narcissus, just so I can see them properly and enjoy watching those early bumblebees enjoying a sip of nectar!
As for the tinselled tulips and those architectural alliums, I plant these far and wide, so there is interest right across the border, end to end and front to back. I delight in brushing past an allium bobbing around right at the front. At the same time I love seeing those perfect purple pom poms all the way down the borders as they lead your eye from one end of the garden to the other. The same for tulips. But with tulips I plant in both small groups of the same cultivar but also completely randomly, mixing up all the tulips bulbs in a bucket and scattering them like hundreds-and-thousands sprinkles.
As I recently discussed in my blog about succession planting, the exact same philosophy applies here. Winter and spring flowering bulbs will be in bloom from December to June, so bare this in mind when you're planting them out in your borders. One common mistake is to forget what happens after these bulbs have bloomed! In most cases, the leaves persist and continue to grow. Snowdrops, crocus, muscari, narcissus, camassia all share this characteristic. Tulip leaves simply yellow and brown. Many alliums have leaves that brown and shrivel as they flower, if not before. The giant alliums, like 'Mars' have enormous leaves that stay lush and green before eventually yellowing and attracting an army of slugs and snails. As I discovered, the placement of bulbs really needs considerable deliberation!
Try this!
Mark out one square metre (or yard) with canes laid on the ground and have this imaginary conversation with yourself:
"Right, where are the gaps? I have some at the front and in between the perennials. Okay, I'm going to have a tuft of snowdrops there, a tuft of crocus there, some early dwarfing early narcissus there (Tête-à-Tête is a good option). Now, which perennials will be growing early and vigorously so they can compete with those chunky tulip leaves? Ok, I'll plant some tulips there, maybe a few larger narcissus here. So, let's think ahead to April and May, which plants here will be able to hide those allium leaves as they brown and shrivel at flowering time? Great! I'll plant a couple of alliums behind that plant, and another couple there..."
Repeat these steps with square metre (yard) blocks all the way down your garden. You'll be ensuring that you'll have spring flowers from at least January to June, with perennials rising to cover strappy leaves and bare ground (left behind when those bulbs go dormant for summer). You'll also be employing one of the simplest but most effective garden design tools and that is block planting repetition. With plants repeated along the border, your eyes are naturally drawn along as your brain recognises repeating colours and forms. Also, while you're there, find your deciduous shrubs and trees, and throw in some early bloomers around those too. Just for good measure!
TOOL TIP
For border planting, I use a sharp trowel or my Niwaki Hori Hori to cut a hole and pull back the soil, The I just pop in a bulb, backfill and firm. The Hori Hori is a very useful tool as it doubles as both a trowel for planting and a knife for weeding.
I make a depth guide with a strip of electrical tape, so I know I’m planting at the right depth. But, as I mentioned previously, the deeper the better. Especially important if you have light sandy soil where frost can penetrate deeper, plant your bulbs extra deep, at least 4x the bulb’s height.
I don’t put anything in the planting hole with the bulbs and neither should you. No grit. No fertiliser.

"Are there plants that compliment bulbs?"
Absolutely! The range of flowering bulbs available is truly vast and you can make expansive displays with bulbs alone. But there is definitely enough interest in the garden, if you wanted to mix those beautiful blooms with other spring ephemerals, perennials, shrubs or even trees! Read on for some ideas...
A question from Instagram by @treetoppetals
Spring bulb buddies
I know many gardeners wish tulips would last all year round. Or that snowdrops would persist for months. But for some bulbs, their fleeting nature actually makes them very useful for bringing early colour to problem spots, before the garden really kicks into gear. Think about your deciduous trees and shrubs. Bare branched all winter, allowing sunlight to reach the ground, before leafing up and shading out again.
Underplanting
This is a great opportunity to plant spring bulbs that will rise and bloom, in the available sunlight, then fade as the shrubs and trees leaf-up. You're actually mimicking nature as this is exactly what happens in woodlands with snowdrops, wood anemones, ramsons (wild garlic), and bluebells, all putting on a glorious show, before quietly fading away as the tree canopy closes in by late spring. The best spring bulbs for underplanting deciduous trees and shrubs are: Cyclamen hederafolium, Cyclamen coum, Galanthus (Snowdrop), Crocus, Scilla (syn. Chionodoxa), early flowering Narcissus (Daffodil), Muscari (Grape Hyacinth), Aconite, Anemone nemorosa (Woodland Anemone). If you struggle with excess moisture in your borders, planting bulbs under trees and shrubs is a safer option as they're constantly drawing moisture, leaving the ground beneath a litter drier. Or in the case of mature trees, practically desiccated!
Trees & Shrubs
Many shrubs and trees have late-winter or early-spring interest that you can combine and complement with spring bulbs. Consider Viburnum x bodnantense, Lonicera fragrantissima, the winter flowering honeysuckle, and Hamamelis (Witch Hazel). These are all very fragrant and add another layer to your winter garden. I also grow Corylus avellana 'Contorta Majestic', the corkscrew hazel with deep burgundy leaves and pink catkins underplanted with contrasting blue muscari. Another great option are the brilliantly colourful winter dogwoods like the classic Cornus sanguinea 'Midwinter Fire' with bright orange-red stems. You can have so much fun underplanting any of these with colourful spring blooms.
Perennials & Ephemerals
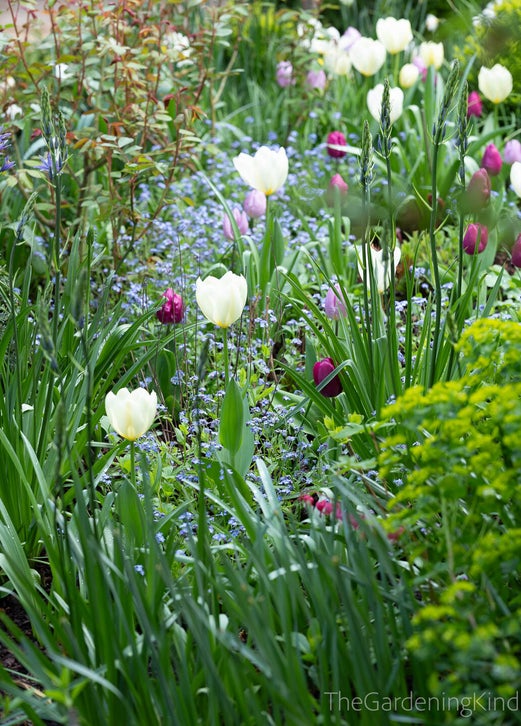
Forget-Me-Not (Myosotis) is a classic accompaniment for tulips. They both flower at the same time, with that forget-me-not blue working so well with practically every colour of tulip imaginable. You also have that interesting contrast of form with dainty forget-me-nots juxtaposed with those unyielding cup-shaped tulip blooms. Forget-me-not will seed about, prolifically, so worth keeping an eye and plucking out seedlings that pop-up too close to emerging perennials as they can reach 50cm (20in) across! Or, like me, relocate those seedlings to areas where you're lacking ground cover and a splash of spring colour.
If you like this combination, but are concerned that forget-me-not will seed around too much, then consider Brunnera which is also excellent for shady spots. You have the same forget-me-not blue flowers, but as a perennial, clump-forming plant that is much slower to spread, but easy enough to divide, should you wish to. Brunnera ‘Jack Frost’ has brightly variegated leaves that literally look like they’ve been frosted. I planted a ribbon of 'Jack Frost' that winds its way through the shady Hornbeam Border and they really have an illuminating quality. Along the same vein are Pulmonaria, another shade lover, with subtle variegated leaves and small clusters of early simple flowers, ranging from pearly white to a deep clear blue, adored by emerging bumblebees.
Hellebores (Helleborus) can be in bloom from December to May, overlapping with all our favourite spring bulbs. Colours range from pure whites to the deepest plums and burgundies, even near black. Their size and form contrasts wonderfully with those large glossy palmate leaves. My hellebores are surrounded by snowdrops, white-flowering daffodils, with pink and white cyclamen, but the choice is limitless.
Companions for snowdrops are rather limited because it is so early in the season. Hellebores are evergreen and will be in bloom, but also cyclamen. Cyclamen coum is available in whites but also a pinks to contrast with whites and greens of snowdrops. Another early bloomer is the wild primrose (Primula vulgaris) with whites and soft butter yellows.
One of my personal favourite combinations is the colour combo of chartreuse and purple/pink. When I see Allium 'Purple Sensation' bumping heads with Euphorbia characias subsp. wulfenii, I just grin like a Cheshire cat. The same colours can be found with smaller (but very thuggish) Euphorbia amygdaloides var. robbiae and pink/purple tulips or Camassia. Theres also the ground hugging combination of Heuchera 'Lime Marmalade' and Muscari.
More brilliant bulb companions to consider are the extremely elegant Lamprocapnos (syn. Dicentra) also known as Bleeding Heart, the taller graceful Aquilegia, Tiarella 'Spring Symphony' and Tellima grandiflora are both clump-forming perennials with spires of tiny flowers, both flowering from late spring. Heucheras with a phenomenal range of colourful foliage. Remember, all the emerging perennials will have mounds of varying greens that can act as foil to the flowering bulbs. Plants like Heuchera and Choisya × dewitteana 'Aztec Gold' can just add that note of difference with colourful foliage.
Recycling bulbs into borders
Our main Terrace Garden display consists of several hundred bulbs. Maybe as many as a thousand! As soon as the flowers fade we deadhead them, immediately. Deadheading is important as it halts seed development, which requires considerable ‘energy’. In theory, the plant can then divert that energy into its regeneration cycle, forming a bigger better bulb and potentially similar or even better flowering the following season. After deadheading, we have a choice:
Option One
Lift the entire clump of bulbs out of their pot and repot them into a recycled plastic pot (of the same size), so they can dieback naturally out of sight. This then frees-up a ‘good pot’ for dahlias and other summer-flowering perennials/annuals. We call this 'hot-swapping'. The deadheaded bulbs are repositioned around in the Kitchen Garden, where they can bake in full direct sunlight.
Once all the leaves have dried brown and crisp and the bulb is 'dormant', we lift the bulbs, separate them, trim off the leaves, tidy the roots, brush off any dirt and store them in the garage. We do this with almost all our Narcissus, Iris, and Muscari bulbs, as they are reliably perennial.

Option Two
Lift bulbs after deadheading and plant them out ‘in the green’, i.e. in full leaf in May or June. This way, you can see exactly where your perennials are growing and the colours of the border. This is generally what we do now for select tulips, crocus, iris, muscari, and hyacinth.
For tulips it’s been an interesting experiment. Knowing that tulips are weaker the following year, I reasoned that smaller blooms would be ok in borders, In 2021, I planted-out all of our display tulips, in the green, into the Flower Garden borders. In Spring 2022, the vast majority of tulips returned, some just as beautiful as the year before, others significantly diminished.
Over the following two seasons, many tulips have continued to fade away, but these ones have remained: Daydream, Negrita, Greenstar, White Triumphator, Sapporo, Mistress, Ballerina, Princess Irene, Angelique.
Of these tulips, Daydream, Negrita, Greenstar, White Triumphator, Ballerina have remained especially strong. Ballerina and Daydream are particularly noteworthy. As beautiful and as vigorous now as when they were first planted.

"Why do tulips flop?"
The main reasons I can think of are moisture levels or a lack of sunlight. Although bulbs are tough little things, once in leaf they will need regular water, just like any other plant, especially so if they’re in pots. A deep weekly soaking should suffice. Tulips are phototactic and heliotropic - they physically move in response to light levels. If it’s too shady, sun-loving tulips can start leaning towards the light and the stems grow weak and etiolate, contributing to droop. My last thought is that they could be planted too shallow and lack the support to remain upright once in bloom.
A question from Instagram by @beesandquietdesign
Predators & Problems
With my bulbs all potted up and tucked around the side of the house to overwinter, out of sight, squirrels and other rodents assume those bulbs are fair game. Squirrels in particular will tenaciously dig down into the pots and pull out bulbs. They seem especially fond of tulips! What can I say… they have good taste! To deter them, I lay metal grids or chicken wire over the pots. Simple, but effective. Once the bulbs are shooting, the squirrels seem far less interested so I remove the guards and put the pots out on display.
I've read rather alarmist articles deterring gardeners from using homemade compost for planting bulbs. "There might be all manor of nasties in there. Viruses, moulds, disease, bulb eating critters!" The list goes on. But they're just listing organisms that naturally occur in the ground and happily coexist with our plants. Do they imagine 'soil' to be a sterile environment? Plants are tough. Disease is rare. I've used homemade garden compost and leafmould for years now. I have never had any issue with creepy crawlies feasting on the bulbs, neither are viruses or disease running rampant. If my compost is good enough to grow something I am going to eat, it's good enough for flowering bulbs.
Slugs and snails definitely have a fondness for many early bloomers. The spring of 2024 was incredibly wet, mild, with very low light levels. It was the absolute perfect environment for those marauding mollusks. It seemed like a plague at times! For the first time ever, I found them shredding narcissus flowers - the trumpet and other petals eaten to the core. At the end of the flowering season, when you've deadheaded and removed the stems of tulips, slugs can seize the opportunity to slime their way down the hole left behind and eat the tulip bulbs. So, when you pull out those stems, firm over the area with your boot!
Practically speaking, there's little to be done about slugs and snails, especially during such freakish springs as '24. You could go out at night with a torch and collect them all (disposing of them as you see fit). In pots, planters, and raised beds you could use nematodes to reduce the mollusk population. But for the garden as a whole, if you have hundreds of bulbs, all this is unrealistic. Take it on the chin and just hope for a cold dry winter!
Tulip Fire
Thankfully, Tulip Fire is something I have never experienced, so this information is from the RHS. Read the full article here.
“Tulip fire is a fungal disease of tulips caused by Botrytis tulipae, which produces brown spots and twisted, withered and distorted leaves. It is so named because in severe cases plants appear as if scorched by fire.” To avoid further spread and contaminations, the following controls should be employed:
- Check bulbs carefully and discard any with signs of the small black sclerotia in the outer scales, or with any signs of decay
- Remove infected bulbs promptly to avoid contaminating the soil with sclerotia
- Do not plant tulips for at least three years in sites where tulip fire has occurred (five years if the disease is grey bulb rot)
- If a contaminated site must be replanted, dig the ground deeply and bury the contaminated upper layers deep enough to be below planting depth
My best advice is to always plant tulips carefully, especially when planting in the ground. Discard any bulbs that are soft and/or show any signs of disease or fungal growth. Most importantly, wait until November or even December to plant tulips in the soil, when the ambient temperature has dropped below 10℃ or 50℉

"Do you really have to lift and store bulbs after flowering. Or leave them in pots?"
In short, no. You could leave your bulbs in their pots indefinitely. When bulbs have finished flowering, deadhead them, give them some seaweed feed (or Tomorite) and leave them somewhere sunny to die back naturally. Don't tie up the leaves. Bulbs need this period to 'recharge'. Remove the leaves only when they are all brown, When bulbs enter dormancy, they like to be dry, so position the pots out of the rain, if possible. The only issue is that the potting compost will eventually run out of nutrition. To combat this, in late winter, remove the top few centimetres of compost and replace with new compost. Then sprinkle over a dose of Fish-Blood-Bonemeal
Add comment
Comments